
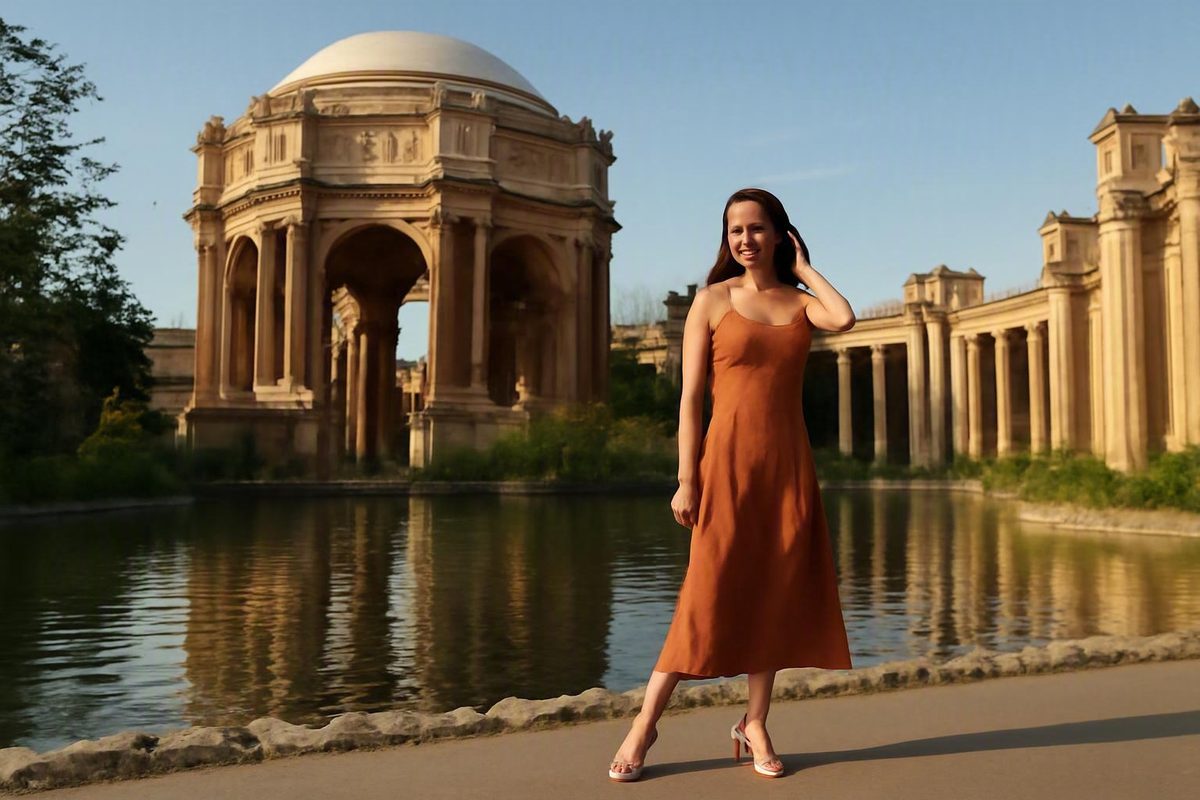
A Palace of Fine Arts photo shoot can produce several distinct looks without a cross-city itinerary. The rotunda and colonnades create monumental, symmetrical portraits; the lagoon and trees soften the setting; and doors, walls, and side paths provide tighter alternatives when central areas are crowded.
The goal is not to photograph every corner. Choose a few priority backdrops, schedule for the kind of light you want, follow a route that fits the session length, and prepare alternate angles for changing crowds and weather.
This guide synthesizes published photographer portfolios and experience-based planning advice. The supplied evidence does not include a current official policy covering outdoor permits, equipment, access, parking, facilities, pets, or accessibility. Treat the creative recommendations below as planning guidance, then verify operational rules with the appropriate San Francisco authority close to the session date.
Is the Palace of Fine Arts the Right Setting for Your Shoot?
The Palace works especially well when you want portraits that feel architectural, formal, romantic, or editorial. Published portfolios document engagement, wedding, graduation, family, Quinceañera, and architectural photography at the site. A Palace graduation guide, for example, shows how the rotunda, colonnades, walkways, and lagoon can support both landmark-scale and closer portraits (Micholiano Photography).
Wedding and Quinceañera photography has also been documented around the Palace, including post-City Hall wedding portraits. These examples establish that photographers use the grounds for several session types; they do not establish current permissions, availability, or operating rules.
The location’s visual range comes from the contrast between architecture and landscape:
- The rotunda and dome provide scale and a strong sense of place.
- Arches and repeating columns create symmetry, leading lines, depth, and natural frames.
- The lagoon, trees, and gardens provide a softer visual language.
- Doors, stone walls, and architectural details support close portraits that do not require the entire landmark in view.
- Paths and side walkways make room for walking, dancing, and candid interaction.
The historic character is integral to the setting. The Palace was originally built for the 1915 Panama-Pacific Exposition, which helps explain its monumental, classically influenced appearance (Palace of Fine Arts venue website).
That scale naturally supports centered compositions. A couple standing beneath an arch or a graduate framed between columns can look intentional without an elaborate pose. The same scale can make people appear too small, however, so a complete gallery should combine wide environmental photographs with medium and close portraits.
Paths, trees, and the lagoon edge offer a useful counterweight to the architecture. Instead of holding formal poses for the entire session, participants can walk, talk, embrace, turn toward one another, or interact with the surroundings. This creates variety without requiring a second location.
It is also important to distinguish the outdoor rotunda, lagoon, and grounds from the separately marketed indoor event venue. The indoor venue has its own gallery, floor plans, event configurations, and booking process. Those materials do not establish whether an ordinary outdoor portrait session requires permission. Reserving indoor event space and confirming outdoor photography rules are separate tasks.
Finally, the Palace is not a controlled studio. Visitors may interrupt wide compositions. Wind can affect hair, clothing, reflectors, and audio. Fog or clouds can alter the mood, while private or public events may affect access to a preferred area. A route that looks compact on a map may also be uncomfortable for someone who has difficulty walking or standing.
Choose the Palace when its architecture is central to the concept—not simply because it appears on a list of San Francisco landmarks. A family seeking a quiet, compact setting, a participant who is particularly sensitive to wind, or a production requiring extensive background control may need a more predictable location.
Check Permits, Access, and Equipment Rules Before You Go
The supplied evidence does not establish the current official permit policy for casual portraits, paid professional sessions, wedding photography, commercial work, or larger productions on the outdoor Palace of Fine Arts grounds.
It also does not establish current fees, application procedures, insurance requirements, equipment rules, public access hours, or after-dark permissions. Do not assume that a small session is exempt, that outdoor photography is free, or that a rule reported several years ago remains in effect.
A commercial photographer’s guide recommends checking current requirements and directs readers toward the San Francisco Recreation and Parks Department. Its examples suggest that a small handheld session may be treated differently from a production involving props, lighting, crew members, or a larger setup, but the guide is not an official permitting source and does not define the controlling thresholds (permit discussion in a photographer’s Palace guide).
Use the San Francisco Recreation and Parks Department as an initial official contact point, then ask the department to confirm whether it manages the exact area and activity involved. If another office, venue operator, film authority, or event manager has jurisdiction, request the correct referral. The evidence supplied for this article does not contain a current official policy page or verified contact path for every part of the property.
Older user reports deserve even more caution. Several people answering a wedding-photography question said they had not paid for ordinary photography, while others speculated that elaborate or space-intensive work might require permission. Those answers were posted years ago and are user-generated anecdotes, not current policy (historical Yelp discussion).
When seeking an official answer, describe the proposed activity accurately rather than asking only, “Can we take photos?” A handheld portrait session involving two people is operationally different from a wedding party with assistants, tripods, light stands, props, rolling cases, generators, or an occupied pathway.
Ask specifically about:
- Whether a permit is required for the planned type of photography
- Whether paid, promotional, editorial, or commercial work is classified differently from personal photography
- Application and location fees, if any
- Required lead time
- Insurance or indemnification requirements
- Group-size or crew-size thresholds
- Restrictions on tripods, flashes, light stands, reflectors, props, drones, generators, or other equipment
- Rules against occupying, obstructing, or controlling public space
- Public access hours for the exact area you intend to use
- Scheduled event closures or reserved areas
- After-dark access and nighttime photography
- Whether the rotunda, colonnades, lagoon edge, paths, and indoor venue are managed under different rules
Do not let an indoor booking page answer an outdoor question by implication. Reserving the indoor venue may grant access only to the space and time named in the agreement. Conversely, outdoor photography permission would not automatically provide indoor access, power, storage, changing rooms, or event facilities.
Keep a brief verification record. Note the date, office contacted, policy page reviewed, name or title of the person who responded, and answer received. Save written confirmation and bring it to the session if applicable. A dated response is more useful than an undated screenshot or an old photographer’s blog post.
Until current official sources are added, this article should not be used as proof that a permit, reservation, or particular piece of equipment is allowed.
Build a Shot List Around the Best Backdrops
Organize the shot list by visual purpose rather than by every feature on the grounds. Choose three to five primary backdrops and assign each one a different kind of image.
1. Rotunda and dome
Begin with a wide environmental portrait that shows the landmark’s scale. Place the subject far enough from the camera for the dome and supporting architecture to read clearly, then make a tighter frame before moving on. The wide photograph establishes the location; the medium frame keeps the people visually important.
The rotunda is especially effective for a wedding party, graduation gown, Quinceañera dress, or formal outfit that benefits from a ceremonial composition. Centered poses suit the architecture, although a slightly off-center angle may be more practical when visitors occupy the middle of the scene.
2. Arches and repeating columns
Use the colonnades for symmetry, leading lines, natural frames, and layered depth. A still, centered pose reinforces the geometry. For a less formal result, ask participants to walk through the frame, look back toward the camera, or pause beneath a single arch.
Columns are also useful when the open central view is congested. A tighter composition can reduce visible background activity while preserving the Palace’s architectural identity. Photograph through an arch, use a column as a foreground edge, or compress a row of columns behind the subject.
3. Front facade
Prioritize the front facade when color, texture, and architectural detail matter. It can create a different result from photographing directly beneath the rotunda. A medium-distance composition allows the surface of the building to become a textured background rather than an enormous object dominating the frame.
Treat the facade as a separate stop only when the available light supports the detail you want and the route leaves enough time to reposition.
4. Lagoon, pond, or fountain
Use the water for wide landscape portraits and visual separation between the subject and the architecture. Reflections may add depth, but do not build the session around perfectly still or unobstructed water. Wind, wildlife, maintenance, visitors, and movement can all change the surface or affect access to a preferred edge.
The lagoon often works well as a closing setting because it looks substantially different from portraits beneath the columns. Make one broad establishing image, then move closer so water and stone become background color rather than the principal subject.
5. Green doors, stone walls, trees, and side paths
These are practical alternatives, not minor decorations. Green doors provide a concentrated block of color. Stone walls create texture without the complexity of a wide public background. Trees, gardens, and side walkways support relaxed movement.
One documented engagement session used the dome, park, trees, and a green door, showing how a session can alternate between landmark-scale and intimate compositions without leaving the grounds. That session also included a dog, although it does not establish current pet rules (documented engagement session).
Pair each setting with a clear portrait approach:
| Setting | Portrait approach |
|---|---|
| Rotunda | Wide establishing portrait, formal group, centered composition |
| Columns and arches | Still symmetry, framed portrait, compressed architectural background |
| Facade | Medium portrait emphasizing color, texture, and detail |
| Paths and trees | Walking, dancing, twirling, or candid interaction |
| Door or wall | Close portrait, clothing detail, or expression-focused frame |
| Lagoon | Wide closing image, silhouette, or backlit composition when conditions allow |
Some portfolios include a distant Golden Gate Bridge element. Treat that as a possible bonus rather than a required photograph. Its usefulness depends on the exact angle, lens, atmospheric visibility, obstructions, and how much of the bridge appears. Never promise a clear bridge portrait as part of a Palace session.
Trying to cover every corner usually creates more walking, hurried transitions, and repeated compositions. As a planning judgment, three strong backdrops with deliberate variation will usually produce a calmer and more coherent session than eight rushed stops.
Choose the Light You Want, Not Just a Generic ‘Best Time’
There is no universally best time for Palace of Fine Arts photographs. Morning, midday, late afternoon, twilight, and night solve different visual problems.
Early morning may improve the chance of softer light and manageable crowds. It can suit families with young children, graduates seeking cleaner architectural frames, or anyone prioritizing the rotunda before the grounds become busier. It does not guarantee an empty scene.
Morning may also favor facade detail. A commercial wedding-photography provider reports that pre-noon light illuminates the front of the building more directly, revealing more color, texture, and detail. The same provider observes that late-afternoon sun may sit behind the structure from many camera positions, creating backlit subjects but less visible facade color. These are experience-based observations rather than guarantees for every date, cloud condition, or camera angle (Palace lighting observations).
Midday is not automatically unusable. The rotunda and colonnades provide architectural shade that can support some portrait work. Watch the transition between sun and shade: a subject standing in shade against a bright open background may require careful exposure, while patches of direct overhead light can create uneven illumination on faces.
Midday works best with a compact plan centered on shaded architecture. It is less suitable when the concept depends on warm, low-angle light or broad, evenly lit landscape views.
Late afternoon may provide warmer or backlit portraits. This can suit engagements, weddings, and movement photographs where atmosphere matters more than crisp facade detail. Backlighting can create separation around hair and clothing, but it also requires attention to exposure and flare.
Golden hour is not a fixed appointment such as 5:00 p.m. It is a changing period tied to the date, season, local sunset time, horizon, and weather. Useful light may disappear earlier behind structures or clouds. Check sunrise, sunset, and twilight for the exact date, then arrive early enough to assess the light’s direction and intensity.
If warm portraits are the priority, begin before the expected light arrives. This leaves time for parking, walking, meeting participants, and waiting for a busy composition. A schedule that begins at the anticipated peak of the light has no margin for delays.
Nighttime architectural photography is a different use case from an ordinary portrait session. In a 2013 example, a photographer arrived before sunset to scout, used a tripod and remote shutter release, switched to Bulb mode, and lengthened exposures as the scene darkened. The longer exposures smoothed the water and reduced some distractions from movement (night photography workflow).
Those settings illustrate one photographer’s process, not a recipe. Equipment, available light, weather, and site conditions differ. More importantly, a historical example does not prove that tripod use or after-dark access is currently permitted. Confirm both through an official source before planning a night setup.
Use a Simple 30-, 60-, or 90-Minute Route
An efficient route begins with prominent views that may become busy, then moves toward tighter architectural details and the lagoon. This protects the essential photographs if crowds increase, weather shifts, or the session ends early.
These routes are conceptual rather than mapped to a verified entrance. Adjust them after confirming access, path conditions, mobility needs, and the meeting point.
A 30-minute route
Use this plan for a quick engagement session, a small family, a graduate, or a couple adding Palace portraits after another appointment.
- Rotunda: Make the wide landmark portrait first.
- One arch or colonnade: Capture one symmetrical image and one tighter frame.
- Lagoon: Finish with a wide environmental portrait.
Limit outfit changes, props, and complicated lighting. Decide beforehand whether the rotunda or lagoon is the non-negotiable image. If the session begins late, protect that priority rather than rushing through all three stops.
A 60-minute route
An hour allows greater variety without turning the session into a full exploration.
- Begin at the rotunda with wide and medium portraits.
- Move through arches and repeating columns.
- Stop at a green door or stone wall for close portraits.
- Use a side path for walking or candid interaction.
- Finish beside the lagoon.
This sequence balances architecture, detail, movement, and landscape. It also leaves some room to wait for passersby or adjust an angle. Keep any clothing change simple and self-contained.
A 90-minute route
Choose this plan when the gallery needs more variety or participants need a slower pace.
- Photograph the rotunda and main architectural views.
- Work through several arch and column compositions.
- Add doors, walls, or facade details.
- Use gardens, trees, and side paths for movement.
- Include fountain or pond views.
- Allow one practical clothing variation.
- Finish beside the lagoon or in the best available late light.
The extra time is useful because it allows the group to wait for a cleaner background, repeat a pose after adjusting clothing, or move more comfortably. One documented wedding session spent more than an hour exploring the buildings and grounds, but that is an example rather than a required duration (documented wedding-session timing).
Every route needs buffer time for:
- Finding the agreed meeting point
- Walking between selected backgrounds
- Adjusting hair, clothing, graduation regalia, or bouquets
- Allowing visitors to pass
- Repositioning for a cleaner angle
- Helping children settle
- Managing mobility needs
- Changing shoes or adding a layer
Prepare two versions of the route: a full plan and a shortened plan. If an event occupies the main area, begin at an available alternate setting. If wind or cold affects participants, skip the most exposed stop. If mobility becomes an issue, reduce the route to one architectural background and one nearby landscape view.
Avoid publishing or relying on unverified walking-time estimates. Distance can feel very different depending on crowds, equipment, formal clothing, children, and accessibility needs. Scout beforehand when exact timing matters.
Manage Crowds, Events, Fog, and Wind Without Derailing the Session
Weekday and early-morning sessions may improve the chance of manageable crowds, but neither guarantees an empty background. Photographer reports identify weekends, Fridays, Saturdays, summer periods, tour activity, weddings, and other events as possible sources of congestion. These are experience-based patterns, not official attendance forecasts.
Use a layered crowd strategy:
- Arrive early. Locate the participants, assess congestion, and confirm that the planned route remains workable.
- Photograph the recognizable view first. Do not save the rotunda for the final minutes if it is the reason for choosing the location.
- Wait selectively. A short pause may clear a background, but waiting indefinitely can consume the session.
- Tighten the frame. A medium portrait between columns shows less background activity than a wide view of the entire rotunda.
- Change height or angle. A small shift may place a column, tree, or subject over a distracting area.
- Keep alternatives ready. Doors, walls, secondary arches, and side paths can preserve the architectural look without requiring an empty central space.
A longer focal length or tighter composition may reduce visible background activity and make other visitors less prominent. It will not eliminate crowds, and compression can sometimes make distant people appear closer together. Treat lens choice as a tool, not a promise.
Weather requires similar flexibility. One engagement photographer described leaving foggy, windy conditions at another location and finding sunshine at the Palace. That contrasting experience involved a single session and does not establish a dependable sunny microclimate (one session’s weather account).
Check the forecast shortly before departure, but expect conditions to vary. Bring a removable layer and secure lightweight accessories. In strong wind, favor structured clothing, sheltered columns, still poses, and movement that works with the wind rather than against it.
Use this backup hierarchy:
- Change the camera angle.
- Move to a quieter or more sheltered area.
- Replace a wide composition with a tighter one.
- Shorten the route to protect participant comfort.
- Adjust the session time if participants and any applicable authorization allow it.
- Use a separately researched alternate location only when its access, travel time, and photography rules have already been checked.
Do not promise clear skies, warm sunlight, green foliage, calm water, reflections, or Golden Gate Bridge visibility. Build the gallery around the Palace’s architecture, which remains useful under a wider range of conditions.
Plan Poses, Clothing, and Participant Comfort
Large architecture creates a scale problem: the photographer may step back to include the dome and make the people too small. Solve this by deliberately alternating between wide, medium, and close frames.
At each major setting, begin with one photograph that establishes the landmark. Then move closer or change lenses so expressions, clothing, and relationships become visually dominant. This is especially important for family portraits, graduation details, wedding attire, and engagement photographs intended for announcements.
The architecture supports still poses such as:
- Standing centered beneath an arch
- Facing the camera between repeating columns
- Turning slightly toward one another
- Placing a graduate or Quinceañera subject at the visual center
- Arranging a small group in a balanced formation
Paths and trees are better suited to movement:
- Walking toward or away from the camera
- Embracing while moving
- Turning or twirling
- Dancing
- Kissing after a walking prompt
- Looking back toward the photographer
- Using a lift-and-spin pose when appropriate and safe
Published engagement images document walking, embracing, kissing, twirling, dancing, and lift-and-spin variations around the arches, columns, lagoon, doors, and walls (documented Palace poses and settings).
Use lifts only when both participants are comfortable, the ground is suitable, clothing permits safe movement, and neither person is at risk of strain or a fall. A turn, handhold, or walking prompt can create motion without requiring an athletic pose.
Formal and vintage-inspired clothing has appeared successfully in Palace portfolios. One published session used a navy suit and long white dress among the pillars and gardens (formal Palace engagement session). That does not make formalwear mandatory. Casual clothing can work when its color, fit, and movement support the intended mood.
When coordinating outfits, consider the backgrounds already present: pale stone, green doors, foliage, and water. Aim for coordination rather than exact matching. Avoid a palette that depends on one seasonal or weather-sensitive feature. For groups, distribute color and visual weight so one bright garment does not unintentionally dominate every image.
Comfortable shoes matter because even a short session involves standing and repositioning. Participants wearing formal shoes can travel between settings in comfortable footwear and change only for selected photographs. Keep the exchange simple enough to manage without seating or a private room.
Bring a warm layer that is easy to remove. Plan outfits that can be adjusted discreetly without relying on a changing facility. A jacket, coat, wrap, or overshirt can also provide a second look without a full wardrobe change.
A dog appears in a documented engagement session, but that example does not establish current pet permission, leash requirements, or wildlife protections. Verify current pet rules before bringing an animal. If permitted, assign someone other than the photographer or primary subject to manage the dog between photographs.
For children, strollers, wheelchairs, large formal garments, or limited mobility, reduce the number of stops. A calm two-location session is better than an ambitious route that leaves participants tired or uncomfortable. Before the shoot, verify accessible entrances, path conditions, drop-off options, rest points, and the proximity of selected backgrounds. Broad paths visible in photographs do not by themselves establish full accessibility.
Run a Final Logistics Check Before Leaving
A third-party photographer guide reports the address as 3601 Lyon Street, San Francisco, CA 94123, but confirm the current official destination and the entrance best suited to your route before departure (third-party Palace logistics guide). A general street address may bring participants to the site without bringing everyone to the same side of the grounds.
Choose a precise meeting point. “Meet at the Palace” is too vague for a landmark with multiple approaches and distinct areas. Use an identifiable entrance, architectural feature, or map pin, and share a photograph or screenshot of the spot. Decide where everyone should go if that area is closed, reserved, or congested.
Verify current parking, transit, loading, accessible drop-off, and event-related street restrictions. Third-party reports about street parking and on-site options are not authoritative and may change. Do not promise a free space, an available lot, or a particular curbside arrangement.
Carry only the equipment the session requires. Keep valuables and unnecessary cases out of sight rather than leaving them visible in a vehicle. This is prudent city practice and does not require characterizing the Palace as a verified crime hot spot.
Facility information is inconsistent. One photographer guide describes restroom and outfit-changing options near the Palace as limited, while another reports public facilities. Neither account guarantees current availability. Confirm restroom status when it matters for children, older adults, a wedding schedule, or a clothing change, and make an outfit plan that does not depend on a clean private changing room.
On the day of the shoot, check:
- Current public access hours
- Permit or written authorization status
- Scheduled events, reserved areas, and closures
- Restrictions for the exact equipment being carried
- Weather, wind, and temperature
- Sunrise, sunset, and twilight times when relevant
- Parking, transit, loading, and accessible drop-off information
- Restroom status
- Pet rules, if applicable
- Accessible entrances and current path conditions
Pack a concise kit:
- Permit or written confirmation, if applicable
- Charged camera batteries
- Empty or verified memory cards
- Minimal authorized lighting equipment
- A removable weather layer
- Comfortable walking shoes
- Water
- Simple hair, makeup, and clothing touch-up items
- Essential participant supplies
- A phone containing the meeting point and backup plan
If the Palace session is part of a larger San Francisco day, avoid placing a nonrefundable or time-sensitive activity immediately afterward. Parking, crowds, participant needs, and changing light can all affect the finish.
The strongest action plan is simple: choose three priority backdrops, select morning or late-day light according to the intended look, adopt a 30-, 60-, or 90-minute route, and prepare an alternate angle for every major stop. Then verify permits, events, access, equipment restrictions, parking, restrooms, accessibility, pet rules, and weather close to the session date. A focused route and flexible expectations will create a calmer shoot than trying to photograph every corner of the grounds.
Do you need a permit for a Palace of Fine Arts photo shoot?
The supplied evidence does not establish the current official rule for casual portraits, paid professional photography, weddings, commercial work, or larger productions.
Begin by contacting the San Francisco Recreation and Parks Department and ask it to confirm jurisdiction over the exact area and activity. Describe the group size, whether the work is paid or promotional, and every piece of equipment involved. Ask about fees, lead time, insurance, access hours, event conflicts, and after-dark use. Retain any written response.
What is the best time of day for Palace of Fine Arts photos?
Choose according to the desired result. Early morning may improve the chance of softer light and manageable crowds. Pre-noon light may reveal more facade color and texture. Architectural shade can support some midday portraits. Late afternoon may produce warmer or backlit images.
Golden hour changes with the date and sunset time, so it is not a fixed appointment. No time guarantees an empty location or a particular quality of light.
How long should a Palace of Fine Arts photo session be?
A focused 30-minute session can prioritize the rotunda, one colonnade composition, and the lagoon. A 60-minute session can add columns, a door or stone wall, and movement on a path. A 90-minute session allows more settings, a simple clothing variation, slower movement, and time to wait for cleaner backgrounds.
Choose the shortest duration that comfortably supports the required photographs, then add buffer time for meeting, walking, clothing adjustments, crowds, and participant needs.
Is booking the indoor Palace of Fine Arts venue required for outdoor portraits?
The indoor venue is marketed separately for booked events, but its booking materials do not establish the rules for ordinary outdoor portraits around the rotunda, lagoon, and grounds.
An indoor reservation and outdoor photography permission are separate questions. Do not book the indoor venue solely on the assumption that it is required for exterior portraits, and do not assume an indoor booking grants unrestricted outdoor access.
Can a dog be included in a Palace of Fine Arts photo shoot?
A dog appears in a published engagement session, but a past portfolio does not prove that pets are currently allowed or establish leash and wildlife rules. Verify current requirements before bringing an animal.
If dogs are permitted, assign a handler, plan where the dog will wait during photographs without it, and keep the route suitable for the animal’s comfort.